Endodontics
June 1, 2026
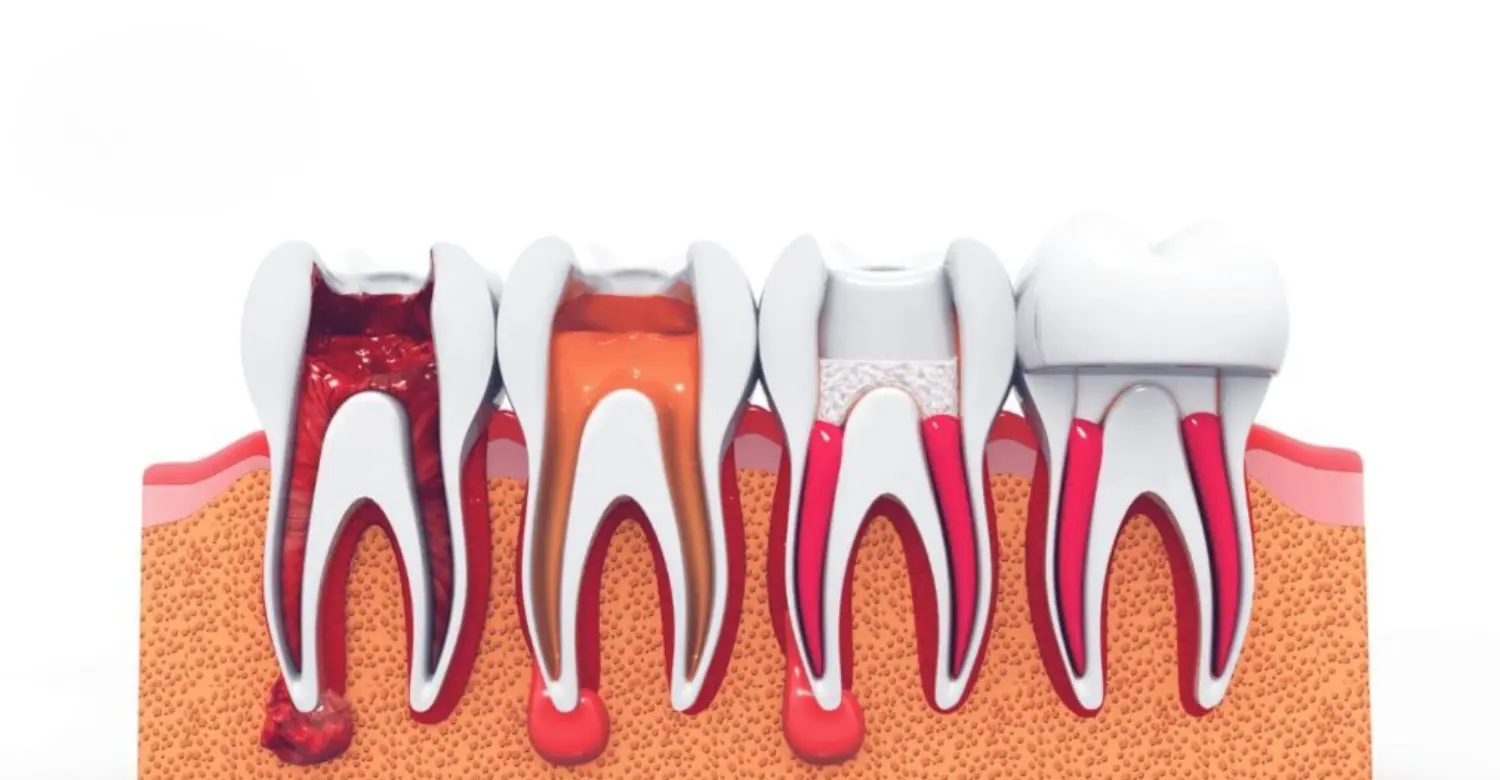
What Does a Root Canal Procedure Diagram Show?

A root canal procedure diagram is a visual guide that helps patients and dental professionals understand the entire root canal process. It illustrates the internal structures of the tooth, including the pulp chamber, root canals, nerves, and blood vessels. By observing this diagram, patients can see where decay or infection has reached and how the dentist will access and clean the infected areas. The diagram often shows each stage of treatment, from diagnosis to filling and sealing the tooth. Using these visuals improves patient comprehension, reduces anxiety, and sets realistic expectations. Dentists rely on these diagrams to communicate effectively and plan precise treatment, ensuring long-term tooth health.
What Is a Root Canal Procedure?
A root canal procedure is a dental treatment designed to save a tooth that has a severely infected or damaged pulp. During this procedure, the dentist removes the infected pulp, cleans the canals, disinfects the area, and seals it to prevent further infection. A root canal procedure diagram helps illustrate these steps, making it easier for patients to understand why the treatment is necessary. Modern root canal treatments are highly effective, with advanced techniques minimizing discomfort. Patients often associate root canals with pain, but with proper anesthesia and care, the procedure is largely painless. This treatment preserves natural teeth and prevents extraction, protecting oral function and aesthetics.
Understanding Tooth Anatomy Before Treatment
Before undergoing a root canal, understanding tooth anatomy is essential. Teeth have three main layers: the enamel, dentin, and pulp. The pulp contains nerves and blood vessels and is prone to infection when decay penetrates deep into the tooth. it visually demonstrates these layers, showing where the infection occurs and which areas require treatment. Recognizing the anatomy helps patients grasp why precise cleaning and shaping of the root canals are crucial. The diagram also highlights the connection between the tooth and surrounding bone, emphasizing the importance of timely treatment. This visual guide ensures patients are informed about their oral health and the steps needed to restore it.
Why Dentists Use a Root Canal Procedure Diagram
Dentists use a root canal procedure diagram to explain the treatment process clearly. Patients often feel anxious about dental procedures, especially root canals. A detailed diagram can demystify the steps, showing how the infected pulp is removed, the canals are cleaned, and the tooth is sealed. It also helps the dentist communicate potential risks and post-treatment care. By visualizing the procedure, patients better understand the importance of the treatment and the outcome they can expect. This tool is also valuable for educating patients about preventive care, reinforcing why early detection and proper dental hygiene are essential to avoid future infections. Understanding your complete clinical environment and the rct setup helps you plan your return to daily activities smoothly and safely.
Root Canal Procedure Diagram Explained Step by Step
it breaks down the treatment into clear, sequential steps, helping both dentists and patients follow the process. Each stage is critical to ensure the infection is eliminated and the tooth is restored to full function. The diagram typically starts with diagnosis and X-ray analysis, followed by anesthesia, opening the crown, removing infected pulp, cleaning, disinfecting, filling, and sealing the canals. Finally, it illustrates placing a crown for long-term protection. By referencing the diagram at each stage, patients understand the necessity of each step and how it contributes to successful root canal therapy, ensuring they feel informed and comfortable throughout the procedure.
Step 1 : Diagnosis and Dental X-Ray
The first step in any root canal is a thorough diagnosis using dental X-rays. X-rays reveal the extent of decay or infection inside the tooth and help locate all root canals. A root canal procedure diagram often shows this step, indicating where the infection resides and how deep it has penetrated. The diagram also demonstrates how the dentist plans the treatment approach based on the tooth’s anatomy. Accurate diagnosis ensures that all canals are treated, preventing future complications. Using a visual guide alongside X-rays reassures patients, as they can see exactly why the procedure is necessary and what the dentist will do to save their natural tooth.
Step 2 : Local Anesthesia and Tooth Isolation
Before starting treatment, dentists administer local anesthesia to numb the tooth and surrounding tissues. This step ensures patient comfort throughout the procedure. The tooth is then isolated using a rubber dam to keep it dry and prevent contamination. it shows how isolation is achieved and why it’s important. Visualizing this step helps patients understand that even though the process may seem complex, every precaution is taken to maintain hygiene and reduce discomfort. Proper anesthesia and isolation are key to a successful root canal, ensuring the infection is removed efficiently while minimizing pain and stress for the patient.
Step 3 : Opening the Tooth Crown
The dentist creates an opening in the tooth crown to access the pulp chamber. This crucial step allows for precise cleaning of the infected areas. A root canal procedure diagram illustrates where and how the crown is opened, guiding patients through the process visually. Understanding this step helps patients realize why careful access is necessary to reach all canals without damaging surrounding tooth structures. Proper access ensures complete removal of the infected pulp and prepares the tooth for cleaning, shaping, and filling. Patients who see the diagram often feel more confident about the procedure because it explains each action clearly and reduces fear of the unknown.
Accessing the Infected Pulp Chamber
After opening the crown, the dentist reaches the infected pulp chamber. it highlights this chamber and shows how tools are used to remove decayed tissue. This visual guide helps patients understand the intricacies of the treatment and why complete removal of pulp is essential to prevent reinfection. The diagram also demonstrates the delicate anatomy of the canals and how precision is critical. By seeing the process step by step, patients can appreciate the expertise required for a successful root canal, making them more informed and comfortable throughout the procedure.
Step 4 : Removing Infected Pulp Tissue
Once the pulp chamber is accessed, the dentist removes all infected pulp tissue. This is crucial to stop the spread of infection and alleviate pain. A root canal procedure diagram helps patients visualize the pulp removal process, showing the exact areas being treated. Using specialized endodontic tools, the dentist cleans each canal carefully, ensuring no tissue is left behind. Complete pulp removal prevents reinfection and prepares the tooth for proper disinfection and filling. Patients often feel reassured when they see a visual representation of this step, as it explains why the treatment is necessary, how infection is eliminated, and how the tooth is restored to health.
Cleaning and Shaping the Root Canals
After removing the pulp, the dentist cleans and shapes the root canals to facilitate proper filling. This step ensures all debris and bacteria are eliminated from the intricate canal system. illustrates the shape and structure of cleaned canals, helping patients understand the precision involved. Proper shaping allows the filling material to completely seal the canals, preventing future infections. The diagram also shows how tools reach the very tip of each root, emphasizing the importance of thorough cleaning. Patients gain confidence when they see these details, knowing the dentist is taking meticulous steps to protect their tooth.
Step 5 : Disinfecting the Root Canal System
Once the canals are cleaned and shaped, the dentist disinfects them using antibacterial solutions. This step removes remaining bacteria and ensures the tooth is infection-free. A root canal procedure diagram often shows the canals filled with disinfecting solution, highlighting the thorough care taken to prevent recurrence. Disinfection is essential to avoid complications like abscess formation or reinfection. Visualizing this step helps patients understand why multiple solutions and irrigation techniques are used. By combining cleaning, shaping, and disinfection, dentists maximize the success rate of root canal treatment, ensuring the tooth can function normally for many years without pain or infection.
Step 6 : Filling the Root Canal
After disinfection, the dentist fills the root canals to prevent reinfection and restore the tooth’s integrity. This is done using a biocompatible material, typically gutta-percha, to seal the canals tightly. it illustrates how the filling material completely occupies the canal space, preventing bacterial invasion. The dentist may also use a temporary filling before placing a permanent restoration. Patients often feel more at ease when they see this diagram, as it visually confirms that the tooth is fully protected. Filling the canals properly ensures long-term success and maintains the strength and functionality of the natural tooth.
Using Gutta-Percha Material
Gutta-percha is a rubber-like material used to fill cleaned root canals. A root canal procedure diagram shows the canals filled from the tip to the pulp chamber with gutta-percha, sealing the tooth completely. This material is biocompatible and prevents bacterial contamination. Visualizing this process helps patients understand how the filling safeguards their tooth and why proper placement is crucial. The diagram also emphasizes the dentist’s precision in ensuring no gaps remain. By using gutta-percha, the treated tooth can withstand normal chewing forces, providing both functional and aesthetic benefits while maintaining oral health over the long term.
Step 7 : Sealing the Tooth
Once the canals are filled, the dentist seals the tooth with a permanent filling or restoration. This prevents bacteria from entering and protects the tooth from fractures. shows the final sealed tooth, highlighting how the canals are isolated and secured. Proper sealing is essential for long-term tooth health and ensures the treatment remains successful. Patients who view this diagram gain confidence in the durability of their restored tooth. By understanding this step, they also recognize the importance of post-treatment care, such as maintaining oral hygiene and avoiding excessive forces on the treated tooth until a crown or final restoration is placed.
Step 8 : Placing a Dental Crown for Protection
After the root canal, a dental crown is often placed to strengthen and protect the tooth. the crown placement over the treated tooth, showing how it restores shape, function, and appearance. Crowns are critical for molars and teeth with large restorations, as they prevent fractures. Patients can see how the crown covers the tooth completely, providing long-term protection. Visual diagrams help patients understand why a crown is recommended and how it contributes to oral health. With proper care, the crowned tooth can last many years, allowing patients to chew, speak, and smile confidently without concern about reinfection or structural damage.
What Does a Root Canal Procedure Diagram Show?
The purpose of a root canal procedure diagram is to explain every stage of treatment from diagnosis to sealing the canals. A detailed illustration also shows the tooth anatomy, infected pulp, surrounding bone, and the instruments dentists use during treatment. At Vitrin Clinic, every patient receives digital imaging before treatment to help them understand the condition of their tooth. Dr. Rifat Alsaman, Head of the Medical Team at Vitrin Clinic and a cosmetic dentist, explains that visual diagrams improve patient understanding and reduce anxiety before treatment. Modern diagrams also demonstrate how preserving the natural tooth remains the primary goal whenever possible.
Root Canal Treatment Diagram: Visual Breakdown of Each Stage
A Root Canal Procedure Diagram provides a comprehensive visual guide for each stage of treatment. From diagnosing the infection to placing a crown, patients can follow the process step by step. The diagram often includes illustrations of tooth anatomy, pulp removal, canal cleaning, filling, sealing, and final restoration. Visual aids make complex procedures easier to understand, especially for anxious patients. Seeing the progression of treatment reassures patients that each step is carefully executed to protect their oral health. Dentists also use these diagrams to explain potential complications, preventive care, and expected outcomes, enhancing patient trust and compliance.
Diagram of Tooth Infection
showing tooth infection highlights areas of decay, inflammation, and pulp damage. Patients can see where bacteria have penetrated the enamel and reached the pulp chamber. Understanding the extent of infection helps patients realize the urgency of treatment. The diagram also emphasizes the connection between infected pulp and surrounding tissues, explaining why untreated infections can lead to abscesses or tooth loss. Visual representation simplifies the explanation of symptoms, such as pain, sensitivity, and swelling, helping patients comprehend why immediate intervention through a root canal is essential for saving the tooth and preventing further complications.
Diagram of Pulp Removal
During a root canal, the infected pulp is carefully removed. A root canal procedure diagram illustrates this step, showing the extraction of tissue from the pulp chamber and root canals. Patients can see the precision involved, including reaching narrow and curved canals. The visual guide demonstrates how dentists ensure no infected material remains, preventing reinfection. Understanding pulp removal through a diagram also clarifies why local anesthesia and careful instrumentation are critical for comfort and effectiveness. By seeing this step visually, patients gain confidence in the thoroughness of the procedure and the dentist’s ability to preserve their natural tooth.
Pulp Sensibility Testing: Thermal and Electrical Assessments Before RCT
Before beginning treatment, dentists must determine whether the dental pulp remains healthy or has become irreversibly inflamed. Thermal testing uses controlled cold or heat stimuli to evaluate nerve response inside the tooth. Electrical pulp testing measures nerve activity by delivering a gentle electrical stimulus to the affected tooth. At Vitrin Clinic, these diagnostic methods are combined with digital X-rays for greater accuracy before planning treatment. Dr. Rifat Alsaman, Head of the Medical Team at Vitrin Clinic, explains that pulp sensibility tests measure nerve response rather than blood circulation. The final diagnosis always considers clinical findings together with radiographic evidence and patient symptoms to ensure appropriate treatment decisions.
Diagram of Canal Cleaning and Filling
After pulp removal, the canals are cleaned, shaped, and filled. depicts this stage in detail, showing how tools access every canal and how gutta-percha fills the space. Patients can observe the meticulous process of ensuring all bacteria and debris are removed. The diagram reassures patients that the tooth will be fully protected once the canals are sealed. Visual representation of cleaning and filling also highlights the importance of precise work, as incomplete treatment can lead to reinfection. Diagrams help patients understand the necessity of this step and the advanced techniques used for long-term success.
Final Restoration Diagram
The final restoration diagram shows the tooth after filling and crown placement. it illustrates how the treated tooth is sealed and reinforced for durability. Patients can see the crown covering the tooth, restoring function and aesthetics. This visual aid emphasizes the long-term protection of the tooth, demonstrating how treatment prevents fractures and reinfection. Understanding the final stage through a diagram reassures patients about the success of the procedure. It also serves as an educational tool, highlighting the importance of regular checkups and oral hygiene to maintain the restored tooth’s health?
Why Dentists Show a Root Canal Procedure Diagram to Patients
Dentists often use a root canal procedure diagram to visually communicate the procedure to patients. Many individuals feel anxious or fearful about root canals, often imagining pain or complications. The diagram simplifies the complex process by showing each step from pulp removal to canal filling and final restoration. Patients can see how the dentist will access the tooth, clean it, and protect it with a filling or crown. Visual representation improves understanding, helping patients grasp the necessity of each stage. It also allows the dentist to explain potential risks, outcomes, and post-treatment care clearly. By showing the diagram, patients feel informed and more comfortable proceeding with treatment.
Improves Patient Understanding
significantly improves patient comprehension of the treatment process. Many patients struggle to visualize what happens inside a tooth during a root canal. The diagram highlights the infected pulp, root canals, and cleaning process, clarifying why each step is essential. Patients can see how the dentist removes infection and restores the tooth, reducing uncertainty. Improved understanding also allows patients to make informed decisions about their dental care. Visual aids complement verbal explanations, ensuring patients grasp critical details such as the importance of filling and sealing canals and why crowns may be necessary for long-term protection and tooth durability.
Reduces Anxiety Before Treatment
Dental anxiety is common, especially for invasive procedures like root canals. Using a root canal procedure diagram helps reduce patient stress by showing a clear, step-by-step visual of the treatment. Patients can see the instruments used, how the tooth is accessed, and the careful cleaning process. This transparency builds trust and reassures patients that the procedure is controlled, precise, and largely painless with modern techniques. Understanding the process visually helps patients focus on the outcome rather than fear. By reducing anxiety, dentists can perform the procedure more efficiently, and patients are more likely to follow post-treatment instructions, ensuring better healing and long-term success.
Helps Explain Post-Treatment Care
A root canal procedure diagram is not just useful for explaining the procedure—it also helps patients understand post-treatment care. Diagrams can illustrate how the filled and sealed canals should be maintained and why crowns or other restorations are necessary. Patients can see the areas that need careful oral hygiene, such as brushing around the crown or avoiding hard foods initially. By visualizing the completed treatment, patients better understand the importance of follow-up visits and adherence to instructions to prevent reinfection or damage. This proactive education encourages long-term oral health and helps patients feel confident in caring for their newly treated tooth.
Apical Periodontitis: What a Diagram Shows When Infection Reaches the Jawbone
A root canal procedure diagram often illustrates what happens after untreated pulp infection spreads beyond the root tip. Bacteria leaving the root canal can trigger inflammation within the surrounding jawbone and periodontal tissues. This condition is called apical periodontitis and frequently appears as a dark area around the root on dental X-rays. At Vitrin Clinic, three-dimensional imaging helps identify bone involvement before treatment begins. Dr. Rifat Alsaman, Head of the Medical Team at Vitrin Clinic, explains that treating infection early greatly increases the likelihood of preserving both the tooth and supporting bone. Prompt root canal therapy removes bacteria before the infection causes more extensive tissue destruction.
Benefits of Understanding a Root Canal Treatment Diagram
Understanding a root canal procedure diagram has numerous advantages for patients. It provides a clear visual roadmap of the procedure, reducing fear and confusion. Patients can follow the steps from diagnosis to final restoration, learning why each stage is necessary. The diagram also illustrates the complexity of root canals, helping patients appreciate the precision and skill required. This understanding promotes informed decision-making, encouraging patients to accept recommended treatment. Additionally, it strengthens communication between patient and dentist, fostering trust. Overall, comprehending a diagram helps patients take an active role in their care, follow post-treatment guidelines, and maintain the longevity of their restored tooth.
Helps Patients Know What to Expect
A root canal procedure diagram prepares patients for what to expect during treatment. It shows each stage, including pulp removal, canal cleaning, filling, and sealing. Understanding the process reduces uncertainty and fear, especially for first-time patients. Patients can see the tools used and the areas treated, making the procedure more tangible. Knowing what to expect also helps patients plan their visit and recovery, such as scheduling time off work or arranging transportation if needed. Diagrams highlight the importance of crowns or restorations, explaining why follow-up care is necessary. This knowledge empowers patients to approach the procedure calmly and confidently.
Builds Trust Between Patient and Dentist
Using a root canal procedure diagram fosters trust between patients and dentists. Visual explanations demonstrate transparency, showing that the dentist is taking precise, careful steps to remove infection and restore the tooth. Patients can see the rationale behind each step, from diagnosis to filling and final restoration. Understanding the process visually reassures patients that the procedure is safe, necessary, and effective. Trust is critical for compliance, as patients are more likely to follow instructions, attend follow-ups, and maintain oral hygiene when they feel informed. Diagrams also encourage open questions, ensuring patients feel respected and involved in their treatment decisions.
Encourages Better Oral Care After Treatment
A root canal procedure diagram also reinforces the importance of oral care after treatment. By seeing how the canals are filled and the crown is placed, patients understand which areas require careful hygiene to prevent reinfection. Diagrams help highlight vulnerable areas and teach patients how to maintain long-term tooth health. Patients who comprehend the treatment visually are more likely to brush, floss, and avoid habits that could compromise the tooth. This understanding contributes to the longevity of the root canal-treated tooth and overall oral health. Visual education empowers patients, making them active participants in preserving their restored teeth for years to come. If you are concerned about the next steps, reading about the timeline for each step can help you prepare for a seamless and comfortable dental experience.
When Do You Need a Root Canal Procedure?
A root canal becomes necessary when the tooth’s pulp is inflamed, infected, or damaged. A root canal procedure diagram helps patients visualize how infection spreads from the pulp to surrounding areas. Symptoms prompting treatment include severe pain, prolonged sensitivity to hot or cold, swelling, and discoloration. If left untreated, the infection can damage the tooth and surrounding bone, potentially leading to tooth loss. Visualizing the procedure through a diagram educates patients on why timely intervention is crucial. By understanding the stages of treatment and the anatomy of the tooth, patients can make informed decisions, reduce anxiety, and cooperate fully with the dentist for a successful outcome.
Common Symptoms
Several symptoms indicate the need for a root canal. A root canal procedure diagram can highlight the affected areas in the pulp and root canals. Symptoms often include persistent tooth pain, especially when chewing, prolonged sensitivity to hot or cold, gum swelling near the tooth, and discoloration or darkening. Some patients also experience tenderness to touch or the presence of a small bump on the gum, indicating infection. By using the diagram, dentists can explain how these symptoms relate to the infected pulp. Recognizing these warning signs early and understanding the treatment visually encourages patients to seek prompt care, preventing complications and ensuring the tooth is preserved.
Severe Tooth Pain
Severe tooth pain is one of the most common reasons for root canal treatment. The pain often arises when decay or infection reaches the pulp, irritating the nerves. A root canal procedure diagram shows how the pulp becomes infected and why this pain occurs. Understanding the source of pain helps patients realize the necessity of treatment. Pain may be constant or triggered by biting, chewing, or temperature changes. By referring to a diagram, the dentist explains how removing the infected pulp alleviates pain and restores comfort. Patients are reassured that the procedure targets the root cause, not just symptoms, providing long-term relief and preserving the natural tooth.
Sensitivity to Hot or Cold
Sensitivity to hot or cold foods and beverages often signals pulp damage. A root canal procedure diagram illustrates how the tooth’s nerves respond to temperature changes when the pulp is inflamed or infected. Patients can see the pathway of pain from the pulp chamber to the root canal. Understanding this process visually helps patients recognize the severity of their condition and the need for root canal treatment. Proper intervention removes the infected tissue and prevents further sensitivity. Diagrams also emphasize that ignoring these symptoms can worsen infection, causing abscesses or tooth loss. Visual explanations empower patients to act promptly for effective relief.
Gum Swelling
Swelling of the gums near a tooth may indicate infection that has reached the surrounding tissues. A root canal procedure diagram highlights how infection spreads from the pulp through the root canals into the gum and bone. Visualizing this connection helps patients understand why immediate treatment is critical. Gum swelling is often accompanied by tenderness, redness, or even pus formation, signaling a serious infection. By showing this stage in a diagram, dentists educate patients on the risks of delaying treatment, such as abscess development or systemic infection. Awareness through visualization encourages patients to seek timely care and follow post-treatment instructions for full recovery.
Darkened Tooth
Discoloration or darkening of a tooth is a common indicator of pulp necrosis or severe decay. A root canal procedure diagram shows how infected pulp can alter the color of the tooth from the inside. Visual explanation helps patients understand that discoloration is not purely cosmetic—it signals underlying infection or damage. Ignoring a darkened tooth can lead to increased sensitivity, pain, and eventual tooth loss. By illustrating this with a diagram, dentists educate patients on the importance of early intervention. Seeing the affected areas helps patients comprehend the necessity of a root canal to remove infection, restore health, and protect the natural tooth. Many patients find that exploring the process of placing the final restoration provides the necessary reassurance and clarity needed before making important decisions.
Risks of Ignoring a Tooth Infection
Neglecting a tooth infection can have serious consequences. A root canal procedure diagram demonstrates how bacteria spread from the pulp into surrounding tissue and bone. Untreated infections can lead to abscess formation, severe pain, swelling, and systemic health complications. Infection may compromise nearby teeth, cause bone loss, and increase the risk of permanent tooth loss. By visualizing these stages, patients understand why timely treatment is essential. Diagrams help explain that delaying care not only increases discomfort but also complicates future treatments. Understanding the risks through a diagram encourages patients to pursue root canal treatment promptly, ensuring long-term oral health.
Tooth Abscess
A tooth abscess is a pus-filled infection that forms at the root tip or surrounding gum tissue. A root canal procedure diagram shows how untreated pulp infection can progress into an abscess, highlighting the connection between the infected tooth and surrounding structures. Patients can see the importance of root canal treatment to prevent severe complications, such as spread to other teeth or jawbone. Early intervention via root canal removes the infection, drains the abscess, and restores health. Visual aids educate patients on recognizing signs like swelling, tenderness, or fever. Understanding this risk motivates prompt dental care and compliance with treatment instructions.
Spread of Infection
Untreated tooth infections can spread beyond the tooth into surrounding tissues and even the bloodstream. A root canal procedure diagram illustrates the pathways of infection from the pulp through root canals into the jawbone and gums. This visual guide emphasizes the importance of timely treatment to prevent systemic complications such as fever, swelling, or more severe health issues. Diagrams educate patients about the potential dangers of neglecting symptoms, reinforcing why early intervention with a root canal is crucial. Visual explanation reassures patients that proper dental care stops the infection, protecting both oral and overall health.
Tooth Loss
If an infected tooth is left untreated, it can result in tooth loss. A root canal procedure diagram demonstrates how decay or infection compromises the pulp, weakens the tooth structure, and can ultimately lead to extraction. Seeing the progression visually helps patients understand why prompt root canal treatment preserves natural teeth. Tooth loss can affect chewing, speech, and aesthetics, making restoration more complex and costly. Diagrams reinforce the necessity of treatment and the benefits of preserving the natural tooth. By understanding the consequences visually, patients are motivated to seek root canal treatment early, ensuring functional and long-term oral health.
Measuring the Canal: How Apex Locators and Working Length X-Rays Ensure Accuracy
Successful treatment depends on cleaning the entire root canal without extending beyond the natural root tip. Electronic apex locators calculate the working length by measuring electrical resistance inside the canal during treatment. Dentists confirm these measurements with digital radiographs before shaping and disinfecting the canals. At Vitrin Clinic, electronic measurement systems improve precision while reducing unnecessary radiation exposure. Dr. Rifat Alsaman, Head of the Medical Team at Vitrin Clinic, explains that accurate working length prevents incomplete cleaning and protects healthy tissues surrounding the root. Careful measurement significantly improves long-term treatment success and reduces the risk of reinfection.
About Root Canal Procedure Diagram
Recent research demonstrates that root canal treatment remains one of the most predictable procedures in modern dentistry. A large systematic review involving more than 1.2 million teeth found that approximately 8.2% of teeth worldwide have received root canal treatment. The same analysis reported that nearly 55.7% of adults have at least one root-filled tooth during their lifetime. At Vitrin Clinic, these findings reinforce the importance of preserving natural teeth whenever possible through early diagnosis and evidence-based endodontic care. Dr. Rifat Alsaman, Head of the Medical Team at Vitrin Clinic and a cosmetic dentist, explains that timely intervention consistently improves treatment outcomes while minimizing the need for more extensive restorative procedures.
Key for Root Canal Procedure Diagram
Statistic | Finding |
Adults with at least one root canal treated tooth | 55.7% |
Teeth that have undergone root canal treatment worldwide | 8.2% |
Reported success rate (strict clinical criteria) | 82% |
Reported success rate (overall clinical success) | 92.6% |
Studies included in systematic review | 42 longitudinal studies |
Sources: International Endodontic Journal systematic reviews.
Why Choose Vitrin Clinic for Root Canal Treatment?
Vitrin Clinic offers comprehensive dental care with a focus on advanced root canal treatments. Patients benefit from cutting-edge technology, precise diagnostic tools, and a modern clinic environment designed for comfort and safety. Treatments are performed by highly skilled endodontic specialists who are trained in the latest techniques. Each patient receives a personalized treatment plan tailored to their unique dental needs, ensuring optimal results and long-term oral health. By combining expertise with patient-centered care, Vitrin Clinic makes root canal treatments efficient, effective, and stress-free. Patients can also see visual guides that explain each step, which helps build confidence and trust in the procedure.
Advanced Dental Technology
At Vitrin Clinic, advanced dental technology ensures accurate diagnosis and treatment. Digital imaging, 3D scans, and modern endodontic instruments allow dentists to visualize the tooth structure in detail. This precision increases the success rate of root canal treatments while reducing discomfort and treatment time. Patients can also benefit from visual aids and diagrams that clarify the treatment process, helping them understand what to expect. By integrating technology with patient education, the clinic ensures that each root canal is performed efficiently, safely, and predictably. This approach minimizes risks and improves long-term outcomes, giving patients confidence in their dental care.
Experienced Endodontic Specialists
Vitrin Clinic employs experienced endodontic specialists with years of training in root canal procedures. These experts handle complex cases with precision, ensuring thorough cleaning, shaping, and sealing of the canals. Specialists can manage intricate tooth anatomy, preventing reinfection and preserving natural teeth. Patients also receive step-by-step explanations supported by visual guides, making the process transparent and easier to understand. The expertise of these specialists not only ensures a successful treatment outcome but also reduces patient anxiety. With experienced professionals leading the care, patients know their dental health is in safe hands, resulting in long-lasting comfort and tooth functionality.
Comfortable and Modern Clinic Environment
Vitrin Clinic prioritizes patient comfort throughout treatment. Modern facilities, relaxing interiors, and advanced dental equipment create a stress-free environment. Pain management techniques, such as local anesthesia and sedation, ensure that procedures are as comfortable as possible. Visual aids, including diagrams and models, further reduce anxiety by showing patients exactly what will happen. A comfortable and modern environment helps patients focus on the treatment outcome rather than discomfort. Combining technology, expertise, and patient-centered care, Vitrin Clinic provides a welcoming experience that encourages patients to maintain regular dental visits and adhere to post-treatment instructions for optimal oral health.
Personalized Treatment Plans
Every patient at Vitrin Clinic receives a personalized treatment plan tailored to their dental needs. Specialists evaluate the tooth’s condition, infection severity, and overall oral health before recommending the best course of action. Personalized plans may include diagrams to visually explain each step, helping patients understand why certain procedures are necessary. This individualized approach ensures precise root canal treatment, reduces risks, and maximizes the tooth’s long-term functionality. Patients appreciate the transparency and clarity offered by these customized plans, which guide them through the procedure, recovery, and post-treatment care. Personalized planning ensures that each patient achieves optimal results with confidence and comfort To ensure the best outcome, we highly recommend reviewing our guide on sedation during the process so you know exactly what to expect moving forward..
What We Notice Clinically
Every patient presents differently even when X-rays appear similar because the progression of pulp disease varies considerably. At Vitrin Clinic, clinical findings are always compared with digital imaging before treatment planning begins. Dr. Rifat Alsaman, Head of the Medical Team at Vitrin Clinic, frequently observes that patients often underestimate infection because discomfort disappears after the dental nerve dies. This temporary reduction in pain does not indicate healing because bacteria continue spreading through the root canal system. Careful diagnosis combining examination, sensibility testing, and radiographic evaluation provides the most reliable foundation for successful treatment and long-term tooth preservation.
Root Canal Treatment at Vitrin Clinic: Step by Step Patient Experience
Vitrin Clinic provides a structured patient experience for root canal treatment, ensuring efficiency, comfort, and clarity. From the initial consultation to post-treatment care, every step is explained in detail, often with visual aids and diagrams. Patients first undergo a thorough examination and diagnostic imaging to assess the tooth’s condition. Specialists then discuss the treatment plan and expected outcomes. During the procedure, patients benefit from modern pain management and precise techniques. After treatment, instructions for oral hygiene, follow-up visits, and restoration care are provided to ensure optimal recovery. This step-by-step approach builds confidence, reduces anxiety, and ensures long-term success.
Consultation and Diagnosis
The patient journey begins with a consultation and diagnosis. Specialists examine the affected tooth, review symptoms, and use advanced imaging to evaluate the infection. Patients are shown visual guides and diagrams to explain the tooth’s anatomy, pulp condition, and treatment plan. This step allows patients to ask questions and understand why the procedure is necessary. Accurate diagnosis ensures that the treatment is precise and effective. By combining professional assessment with visual explanations, Vitrin Clinic helps patients feel informed, comfortable, and prepared for the root canal procedure. This initial consultation sets the stage for a smooth, successful treatment experience.
Digital Imaging and Root Canal Procedure Diagram Explanation
Digital imaging tools, including 3D scans and X-rays, are used to evaluate the tooth’s condition. Patients are shown a detailed root canal procedure diagram that visually explains each stage of treatment. Diagrams highlight the pulp chamber, root canals, and areas that require cleaning and filling. This visual explanation reassures patients and helps them understand why each step is important. Combining imaging with diagrams increases accuracy during treatment and improves patient confidence. Patients can clearly see the infection, treatment plan, and expected outcomes, ensuring transparency and reducing anxiety about the procedure.
Comfortable Root Canal Treatment
Root canal treatment at Vitrin Clinic is performed in a comfortable, patient-focused environment. Local anesthesia and sedation techniques minimize discomfort, while modern instruments allow precise cleaning and filling of the canals. Patients are guided through each step, often referencing diagrams to visualize the process. The combination of technology, expertise, and patient education ensures a smooth procedure with minimal stress. Patients leave with a restored, infection-free tooth and confidence in the quality of care. By prioritizing comfort and clarity, Vitrin Clinic ensures that even complex root canal treatments are manageable and pain-free. For a deeper understanding of your treatment options, check out our insights on complex molar anatomy to make an informed choice for your smile.
Post-Treatment Care and Follow-Up
After the procedure, patients receive clear instructions for care and recovery. Recommendations may include proper brushing and flossing, dietary considerations, and temporary precautions until a crown or restoration is placed. Follow-up appointments ensure healing and evaluate the success of the treatment. Diagrams are often used to illustrate the tooth’s restored structure and areas to monitor. This visual guidance reinforces the importance of adherence to instructions and regular checkups. Post-treatment care at Vitrin Clinic ensures long-term tooth health, reduces complications, and maximizes the lifespan of the root canal treatment. Patients leave informed and confident in maintaining their restored teeth.
Clinical Note
Early tooth decay frequently develops without noticeable pain or visible changes, making home detection extremely difficult for most patients. Dental examinations supported by digital X-rays identify decay between teeth and beneath enamel before irreversible pulp damage occurs. At Vitrin Clinic, preventive evaluations help detect hidden cavities before root canal treatment becomes necessary. Dr. Rifat Alsaman, Head of the Medical Team at Vitrin Clinic, explains that treating cavities during their earliest stages usually preserves more natural tooth structure. Early diagnosis remains one of the most effective strategies for avoiding complex endodontic procedures and maintaining lifelong oral health.
Tips for Patients
Using toothpaste containing 1,450 ppm fluoride strengthens enamel and reduces the likelihood of future tooth decay developing. After brushing, spit out excess toothpaste without rinsing because fluoride continues protecting the tooth surface for longer periods. At Vitrin Clinic, patients also receive personalized oral hygiene instructions based on their individual cavity risk and treatment history. Dr. Rifat Alsaman, Head of the Medical Team at Vitrin Clinic, recommends consuming sugary foods during meals instead of frequent snacking throughout the day. Reducing the number of acid attacks on teeth plays a greater role in cavity prevention than simply reducing total sugar intake.
Clinical Insights from Vitrin Clinic
Modern root canal treatment is no longer performed using experience alone because digital technology has greatly improved diagnostic precision and treatment planning. At Vitrin Clinic, three-dimensional imaging, electronic apex locators, and magnification enable clinicians to identify complex canal anatomy that conventional methods may overlook. Dr. Rifat Alsaman, Head of the Medical Team at Vitrin Clinic, frequently observes that patients who seek treatment soon after symptoms appear usually require less complicated procedures and preserve more healthy tooth structure. Clinical experience also shows that the long-term success of root canal therapy depends not only on cleaning the canals thoroughly but also on restoring the tooth with a well-sealed permanent restoration that prevents bacterial leakage.
Conclusion
A root canal procedure diagram helps patients understand each stage of treatment, from diagnosis and pulp testing to canal cleaning, disinfection, filling, and final restoration. Understanding every step reduces uncertainty and allows patients to make informed decisions about preserving their natural teeth. At Vitrin Clinic, advanced diagnostic technology and evidence-based treatment protocols help maximize long-term treatment success while maintaining patient comfort throughout the procedure. Dr. Rifat Alsaman, Head of the Medical Team at Vitrin Clinic and a cosmetic dentist, emphasizes that early diagnosis remains the most effective way to save infected teeth before extensive damage develops. With timely professional care and regular follow-up, most root canal treated teeth can continue functioning successfully for many years.
Reference
1. Institutional Guidelines & Treatment Standards
American Association of Endodontists (AAE): Endodontic Competency & Treatment Standards. The AAE outlines standard-of-care protocols for chemo-mechanical preparation, rubber dam isolation, and obturation.
European Society of Endodontology (ESE): Quality guidelines for endodontic treatment: consensus report of the European Society of Endodontology. International Endodontic Journal, 39(12), 921–930.
Focus: Standardized European quality metrics for root canal preparation, diagnostic criteria, and success metrics.
2. Primary Scientific Literature on Root Canal Protocols
Haapasalo, M., Shen, Y., Wang, Z., & Gao, Y. (2014). Irrigation in endodontics. British Dental Journal, 216(6), 299–303.
Focus: Detailed breakdown of chemical irrigants ($\text{NaOCl}$, $\text{EDTA}$) used during shaping to eliminate biofilms inside complex root anatomies.
Siqueira, J. F., & Rôças, I. N. (2008). Clinical procedures and the outcome of endodontic treatment. Dental Clinics of North America, 52(1), 179–210.
Focus: Analysis of root canal microbiology and step-by-step procedures to minimize endodontic failure rates.
American Association of Endodontists. (2018). Treatment standards and clinical guidelines. AAE White Paper. https://www.aae.org/specialty/clinical-resources/
European Society of Endodontology. (2006). Quality guidelines for endodontic treatment: consensus report of the European Society of Endodontology. International Endodontic Journal, 39(12), 921–930. https://doi.org/10.1111/j.1365-2591.2006.01180.x
Haapasalo, M., Shen, Y., Wang, Z., & Gao, Y. (2014). Irrigation in endodontics. British Dental Journal, 216(6), 299–303. https://doi.org/10.1038/sj.bdj.2014.204
FAQs

Dr. Rifat Alsaman has more than 5 years of clinical experience in dentistry and currently serves as the Head of the Medical Team at Vitrin Clinic. He is dedicated to providing exceptional patient care, overseeing treatment planning, and ensuring the highest clinical standards across the team. His expertise, attention to detail, and commitment to continuous professional development have helped countless patients achieve healthier, more confident smiles.


.webp&w=3840&q=75)
